Marble Chiffon Cake

Assalamualaikum and a very good day guys. Early this week my aunt asked me to share a write up of her chicken rice recipe from my blog utk bagi kat kawan dia ….. yes.. her recipe, not mine. I guess she malas nak type it, so I searched up the recipe and bagi l link tu kat dia and suddently, terasa rindu pulak kat my blog ni.. so here I am, trying to kuatkan semangat and update my blog hahaha.

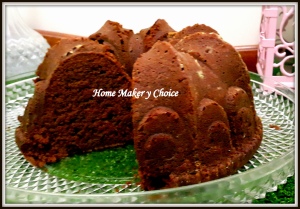
This recipe I took from the video here but I did tweak the recipe a bit… bukan sebab I terlebih pandai but I adjust it to suit my taste. One might ask, how would I know the taste kalau this is my first time baking this recipe… well, I have baked quite a number of chiffon cake before this, so, I can roughly agak2 how the cake will taste. Therefore, I add one or two things that I think will make the cake taste better. The actual name of this cake is Hurricane Cake but since mine doesn’t look like hurricane at all, so I called it marble chiffon lah hehehe. This chiffon cake is very soft and fluffy. Not too sweet and my better half just loved them, alhamdulillah.

Happy baking guys.

INGREDIENTS

  • 10g cocoa powder (step1)
  • 2 Tbsp. water (step 1)
  • 5 egg yolks
  • 50 g sugar (step3)
  • 50 ml vegetable oil
  • 65 ml milk
  • 75 g cake flour
  • 1 tsp. vanilla essence
  • 5 egg whites
  • 1/4 tsp cream of tartar
  • 65 g sugar (step5)

INSTRUCTIONS

  1. Preheat the oven to 150ºC. You will also need a 17 cm (7”) chiffon cake pan.
  2. Put cocoa powder into a small bowl and then pour in 2 tbsp. water. Mix well until it form a runny paste. Set aside.
  3. In a large bowl, whisk milk and vegetable oil until fully incorporated. Add in sugar and mix till sugar dissolved.
  4. Sift cake flour into the mixture and mixed well. Add in egg yolk and vanilla essence, whisk till fully incorporated. Make sure there are no lumps. Set aside.
  5. In another bowl, whip the egg whites on medium-low speed until you see large bubbles begin to appears. Add cream of tartar and whip till they become foamy and frothy. Add the sugar slowly and continue whipping until stiff peaks form.
  6. Using a spatula, fold in ⅓ of the egg whites to the batter until the mixture is homogeneous. Fold in the rest of egg whites in 2-3 increments and fold gently until the mixture is homogeneous.
  7. Pour 170g of the cake mixture into a bowl of cocoa mixture from step2. Mix well using folding method.
  8. Pour the remaining batter into the ungreased 17 cm(7”) chiffon cake pan and then add the cocoa cake batter on top. Run a skewer into the batter to make some marbling effect.
  9. To remove or prevent air pockets before baking, tap the pan gently a few times.
  10. Bake for about 35 to 40 minutes or until a toothpick inserted comes out clean.
  11. The cake must be cooled upside down in its pan so that it stretch down instead of collapsing. Let it cool completely.

Earl Grey Chiffon Cake

Earl Grey Chiffon Cake

Assalamualaikum and good day guys. Recently I have been experimenting with new recipes, attempting new flavours that are uncommon in chiffon cake. Last few days I tried Tiramisu Chiffon cake and it was a hit. The cake finished before I got a change to take pictures. I promise I will share the recipe next time I bake it.

Today’s lucky recipe is Earl Grey Chiffon cake. Recipe was taken from this blog. To tell you truth I was a bit skeptical about this recipe simply because the recipe asked for a powdered earl grey tea to be added into the batter.. worried that it will taste weird but I was wrong.. it taste wonderful. We loves earl grey tea and it is a must have tea in our home. If you have not tried earl grey tea before, do give it a try. The flavour is unique. We also loves Russian Earl Grey tea but cant seem to find it here.

Anyways… let me tell you about this cake. It is so light, spongy and airy with nice fragrance from earl grey tea, this delightful Earl Grey Chiffon Cake is a perfect dessert for your afternoon tea! I did tweak a little bit on the sugar part simply because the recipe ask for very little sugar and from experience, I know that with that amount of sugar the cake wont be sweet and for me.. cake is a dessert, therefore it need to be sweet LOL. Do try this recipe and I promise you that it will be worth you while. Happy baking.

INGREDIENTS
  • 2 tsp Earl Grey loose tea leaves  (For step 2)
  • 1 Tbsp Earl Grey loose tea leaves (For step 3)
  • 6 Tbsp hot water
  • 3 egg yolks
  • 60 g sugar (original recipe ask for 30 g)
  • 3 Tbsp vegetable oil
  • 75 g cake flour
  • 1 tsp baking powder
  • 3 egg whites
  • 1/4 tsp cream of tartar (not in the recipe)
  • 70 g sugar (original recipe ask for 55 g)
INSTRUCTIONS
  1. Preheat the oven to 170 ºC. You will also need a 17 cm(7”) chiffon cake pan.
  2. Put 2 tsp Earl Grey loose tea leaves in a food processor and grind them to fine powder. Set aside.
  3. Put 1 Tbsp. Earl Grey loose tea leaves in a fine sieve over a bowl and pour 6 Tbsp of hot water to seep a strong tea. After cooling down, remove the tea leaves and use ONLY 4 Tbsp Earl Grey tea and set aside.
  4. In a large bowl, whisk egg yolks and sugar. Add vegetable oil, 4 Tbsp earl grey tea and whisk all together until combined.
  5. Add the powdered Earl Grey tea in the egg mixture and mix well.
  6. Sift cake flour and baking powder into the egg mixture and whisk until totally incorporated and make sure there are no lumps.
  7. In another bowl, whip the egg whites on medium-low speed until you see large bubbles begin to appears. Add cream of tartar and whip till they become foamy and frothy. Add the sugar slowly and continue whipping until stiff peaks form.
  8. Using a spatula, fold in ⅓ of the egg whites to the batter until the mixture is homogeneous. Fold in the rest of egg whites in 2-3 increments and fold gently until the mixture is homogeneous.
  9. Pour the batter into the ungreased 17 cm(7”) chiffon cake pan ( Since I don’t have 17cm pan, I use my 22 cm pan, therefore my cakes a not as tall). To remove or prevent air pockets before baking, run a skewer (chopstick, knife or spatula) through the batter and then drop gently a few times.
  10. Bake in the preheated oven for 30-35 minutes, or until a toothpick inserted comes out clean.
  11. The cake must be cooled upside down in its pan so that it stretch down instead of collapsing. Let it cool completely.

Rich Marble Cake

Assalamualaikum and good morning people. I really hope that you guys have a peace and quiet morning everyday.. sadly, that will never happen to me… why? I tell you why.. I live next door to a crazy school. When I say crazy.. I really mean craaazyyyy. Every morning the school has an assembly.. yes… you heard it right.. every single day without fail. The crazy thing is, they had a loud speaker on and the teacher is still shouting. They starts “blabbering” as early as 7.20am and it will go on and on until 8 am and on some days, until 8.40am. Doesn’t the class should starts at 7.40am? Everyday they will ask the student that already at the assembly place to sit down and open a book and read before they start talking at 7.30am. Among other things that they always blabbering are scolding students that come late i.e 7.33am, complain about the parents and sometimes they even test the students’ English or Arabic vocabulary there. They seems to have a lot of activities.. price giving for god knows what competition, read poem, sing and lots of other stuff and all is done in the morning. I have talked to some of the neighbors and all of them are really annoyed by the school but we don’t know who do we complain to. My husband did called the school once and told them that they should not talk that loud as they already have the loud speaker… they apologized and reduce the volume for few day and after that back to their normal self. Hmm… pening makcik!

Okay… enough about complaining, back to the recipe. It has been awhile since I last bake. Being thinking about baking a cake for couple of weeks already but couldn’t find the “mood rajin” anywhere hehehe. I have a couple of recipes that I wanted to try and the lucky pick for this week is Rich Marble Cake and definitely it is a good choice. The cake is soft, fluffy and chocolaty. The finish product definitely depends on the ingredient that you used.. to get a good cake, do use a good butter and also a good chocolate. Mind you, the price of these 2 ingredients in Malaysia are really crazy.. I always stock them up whenever there is a promotions as normal cost for a good butter is never lower than  RM10 per 250g and don’t get me talking about a good imported chocolate.. hmm… insanely expensive oh.. how I miss shopping in Middle East.

The recipe was taken from here. Give it a try if you feel like baking. Have a good day people!

Ingredients

  • 125 g salted butter
  • 125 g sugar
  • 125 g melted dark chocolate ( I used milk chocolate)
  • 155 g self raising flour
  • 2 eggs
  • 1 tsp vanilla extract
  • 80 ml evaporated milk or fresh milk ( I used fresh milk)

Method

  • Melt dark chocolate and let it cool (micro or use double boiler method)
  • Cream butter and sugar till creamy
  • Add egg one at a time and continue to beat till well blended
  • Add vanilla extract
  • Add in flour alternating with fresh milk.. (flour-milk-flour-milk-flour)
  • Divide batter into two parts and add melted chocolate into one..
  • Pour batter alternately and make a swirl using chopstick or butter knife
  • Bake in a preheated oven of 170 C for 35 – 45 mins

Orange Chiffon Cake

Assalamualaikum and good day guys. Has it been 6 months since my last posting? Really? Gosh… I really need to start writing again… there are a lot of things that I want to share but it seems like time is not on my side. Having said that.. ada jugak time that I want to write but I cant find my laptop or my laptop is out of battery… so straight away mood malas datang… excuse and more excuse hehehe

Okay.. just a quick update since my last posting…

… Celebrated Ramadhan and Eid without Aina and Nurin. Eid was short as Sofea’s final exam was on the 10th day of Eid. We came back to KL early so that she has time to study for the finals. Jasmine and Haqeem’s final exam were on the following week… stress? Nah… being doing this for so long… dah immune hahaha.

…. Attended Aina’s graduation in Portsmouth, UK in July. We stayed in UK for almost 1 month. Jalan jalan? Not really.. was there to attend the graduation, help Aina packed her staff to send home and and helped Nurin to pack her staff to move to another apartment. UK weather was sooo hot during our visit ( weird coming from a person who spent the last 10 years in Middle East). Well.. apa tak panas nya.. rumah dia org ni don’t even have a fan.. AC tak payah cakap la. But… having said that, the temperature in the evening was nice… we managed to do bbq few times at the park near the beach. We did a lot of walking in the evening… that was something that I enjoyed during the stay.


… Aina and Nurin came back with us mid of August. It was lovely to have everyone under the same roof. House was noisy and happening hehehe just they way I remembered.

… Celebrate a quiet Eid Adha in KL. Did not take a trip back to Kelantan for few reasons… Sofea started her 1st year of University on the 6th day of Eid, Nurin started her internship on the same day and the main reason was we do not have the transport to balik Kelantan hehehe. Flight was fully booked and we only have a 5 seater car.

… Aina celebrated her 23rd birthday on the 18th Sept and at 2 am the following day Nurin flew back to UK to start her final year… it was hard to let her go knowing that this year she will be alone but insyaallah she will be okay as I put all my trust in Allah to protect her while she is away from home. Counting days till we will be together again insyallah in July.

Bye Bye Ein

Okay.. enough with the update, lets look at the recipe. I am sharing another chiffon cake recipe today.. something light, fluffy and tangy. I promise that you and your family will love this cake. This time instead of using the normal full size chiffon pan, I use the small chiffon pans that I bought quite sometime ago (more than 2 years hehehe) but have not been given the opportunity to use it (excuse la tu). Happy baking guys!


Ingredient A 

  • 4 egg yolks
  • 70 ml corn oil
  • 115 ml orange juice ( freshly squeeze from 2 oranges)
  • 100 g fine sugar
  • 150 g flour
  • 1 tsp baking powder
  • 1/4 tsp salt

Ingredient  B

  • 4 egg whites
  • 90 g fine sugar
  • 1/4 tsp cream of tartar

Method:-)

  • Preheat oven at 175 C. Sieve together flour, baking powder and salt. Set aside.
  • In a mixing bowl, mix egg yolks and sugar until well combine. Add in the corn oil and orange juice and mix well.
  • Add the flour mixture and mix until the mixture is smooth.
  • In a mixer, whisk egg whites until foamy and then slowly add sugar and cream of tartar. Beat until stiff peaks form.
  • Fold in the egg white into the egg yolk mixture in 3 batches. Fold until well combined and pour into an ungreased chiffon cake pan.
  • Bake for about 45 – 50 min or until skewer comes out clean.
  • Invert chiffon cake immediately onto a wire rack and let it cool before removing from pan.


Red Velvet Chiffon Cake

Red Velvet Chiffon Cake

Assalamualaikum  and good day guys. Weekend is finally here.. yeay! I know that I am a full time mum.. but weekend is still something that I look forward to. Some people say  “You are so lucky.. tak payah kerja”..  Well.. it is not always lucky you know.. there are some good and some bad sides of not working.. take it from person who had worked for 15 years and a stay home mum for over 10 years. To tell you the truth… stay home mum is really tiring and challenging. House work is never finished but the best part of it is knowing that you are there full time for your kids.. they can drive you crazy but still totally worth it. I am lucky to be able to do this at the right time.. the time when my girls are growing up and needed my full and undivided attention. I am glad to say that my kids tell me almost anything and I am always there to hear their problems and “life crisis” anytime day or night. If you asked me whether I miss my working days.. the answer is YES! Sometimes I miss having nice lunch with friends or go window shopping on Friday lunch break. Do I want to go back to work?… definitely NO.  What can I say.. I love what I do now.. managing the house hehehe.

Enough with the blabbering… lets talk about our recipe today. This chiffon cake is my other half’s favourite kind of cake. This cake is super soft, fluffy and light. I took my normal pandan chiffon cake recipe and tweak it a little bit and voilà! its RV chiffon cake. Since it is the weekend.. Sofea is coming home from her Uni… why not bake a light cake for the family… something to enjoy on a rainy afternoon with tea at the pergola.

Have a nice and relaxing weekend folks!

Ingredient A 

  • 4 egg yolks
  • 70 ml corn oil
  • 70 ml buttermilk
  • 45 ml water
  • 1 tsp vinegar
  • 100 g fine sugar
  • 2 tsp red colouring
  • 1 tsp vanilla essence
  • 145 g flour
  • 2 tsp cocoa powder
  • 1 tsp baking powder
  • 1/4 tsp salt

Ingredient  B

  • 4 egg whites
  • 90 g fine sugar
  • 1/4 tsp cream of tartar

Method:-)

  • Preheat oven at 175 C. Sieve together flour, cocoa powder, baking powder and salt. Set aside.
  • In a mixing bowl, mix egg yolks, buttermilk, water, red colouring, vanilla essence and sugar until well combine. Add in the corn oil and mix well. Then add the vinegar. Lastly add the flour mixture and mix until the mixture is smooth.
  • In a mixer, whisk egg whites until foamy and then slowly add sugar and cream of tartar. Beat until stiff peaks form.
  • Fold in the egg white into the egg yolk mixture in 3 batches. Fold until well combined and pour into an ungreased chiffon cake pan. Bake for about 45 – 50 min or until skewer comes out clean.
  • Invert chiffon cake immediately onto a wire rack and let it cool before removing from pan.

Deep Chocolate Sour Cream Pound Cake

20160726_094420

Assalamualaikum and good morning to everyone where ever you are. Muscat is very quite at the moment.. all my friends are still in Malaysia enjoying their summer holidays. Cant wait for them to come back. Would love to lepak2 and kopi2 talking about everything under the sky. Thank you for making my life interesting friends… and just to let you know.. Chatime and Costa miss us very much hehehe. Come home soon please!

Last weekend we attended a candy making class at Spun in Avenues Mall. It was fun. I will tell you all about it in my next posting. Okay.. as for now, let me tell you something about this fabulous cake. To tell you the truth.. I have been wanting to make this cake since last year but the word ‘pound cake’ made me a bit skeptical. You see.. I love a soft and moist cake and the word pound kinda suggested that the cake would be dry and hard.. so I keep on pushing the recipe down my baking list.

What make me decided to bake it? Well.. Bisous A Toi’s last IG posting made me change my mind. She baked it in a very lovely bundt pan.. and not all cakes can be baked in a bundt pan, it has to be of certain texture. Since I have a bundt pan that I have bought loooong time ago and never been used.. I decided to  give this recipe a chance. And… I am so glad that I baked it. The texture is soft and definitely moist. My kids told me that even though the texture is different than my normal chocolate cake but it is a good kinda different… yeayyy!

This is where I took the recipe from.. Bisous A Toi blog. Rima is one of my favourite blogger.. love her cakes and recipes. May Allah bless her always.

20160726_094510

Ingredients

1.5 cups (181g) all-purpose flour
1/2 cup (57g) cake flour
1 cup (92g) Dutch-processed cocoa powder
2.25 teaspoons baking powder
1/2 teaspoon salt
1.5 cups (340g) unsalted butter, softened
2.5 cups (500g) granulated sugar
4 large eggs
2 teaspoons vanilla extract
1 cup (242g) sour cream
Method
  • Preheat the oven to 150C. Grease the inside of a 10-inch Bundt pan generously with butter and then dust with flour. (I baked mine at 160C and next time I am gonna dust it with cocoa powderso that it would not have white spots on the cake)
  • Sift the flours, cocoa powder, baking powder, and salt into a medium bowl. Set aside.
  • In a bowl of an electric mixer, using the paddle attachment, beat the butter at medium speed until very creamy, about 2 minutes. Gradually beat in the sugar. Increase the speed to medium-high and beat until the mixture is well-blended and light, about 4 minutes.
  • At medium speed, beat in the eggs one at a time, mixing well after each addition and scraping down the sides of the bowl as necessary.In a small bowl, stir the vanilla extract into the sour cream. At the low speed, add the dry ingredients to the butter mixture in 3 additions, alternating with the sour cream mixture in 2 additions and mixing just until blended. Scrape the batter into the prepared pan and smooth the top.
  • Bake the cake for 65 to 75 minutes, until a cake tester inserted into the center comes out clean. Cool the cake in the pan on a wire rack for 15 minutes. Then invert the cake onto the rack and let it cool completely.

Butterscotch Chocolate Chip Brownies

Assalamualaikum all. We are in the middle of 3 months summer break at the moment. Kids were on leave since mid June and the school will only resume end of August. I was actually looking forward to days not having specific things to do.. days that I can just chill around the house… well after I month of doing nothing, I kinda miss my normal routine sending kids to school and attending some classes myself. How I wish the weather is not this hot.. at least we can go to the beach and relax. With the temperature well above 46C.. we would be ‘ikan kering’ kalau dok bercanda di pantai hehehe.

If it is up to me, I would be trying all the recipes that I have accumulated for the past 9 months but I am worried that with  no activity what so ever, my kids will be unrecognizable by the end of summer due to all the cakes and other sweet stuff. So.. I am trying to just bake once a week. And… the winner for this week is this Butterscotch  Chocolate Chip brownies. Recipe was taken from I am Baker blog and thank you for such a simple yet delicious recipe. This recipe is not huge, so if you have big family like me.. it will disappear the moment you put them on the table hehehe.  Maybe.. I can bake again this week since this recipe only yield 9 normal size brownies hehehehe.

Okay.. let me show you want are needed..

Dry Ingredients
  • 1 cup white sugar
  • 1/3 cup unsweetened cocoa powder
  • 1/2 cup all-purpose flour
  • 1/4 teaspoon salt
  • 1/4 teaspoon baking powder
  • 100g butterscotch chocolate chip
Wet Ingredients
  • 1/2 cup butter melted, then cooled
  • 2 eggs
  • 1 teaspoon vanilla

Instructions

  1. Sift together all dry ingredients except chocolate chip in a medium bowl.
  2. Melt butter and set aside to cool slightly.
  3. Add two eggs and vanilla into the bowl and stir gently.
  4. Pour the melted butter into brownie mixture and mix until just incorporated. Add in the chocolate chips.
  5. Spread batter in a prepared 8-inch square pan and bake for 20-22 minutes at 350 degrees.”

20160303_192728

P/S: At the very moment I am writing this post.. there are only 2 slices of brownies left hehehe. Well done girls!

Red Velvet Layered Cake

20160714_172239-01

Assalamualaikum. Hopefully it is not too late for me to wish everyone Eid Mubarak. Ooppss.. some people maybe angry with the phrase that I use here.. Eid Mubarak.. hehehe. Why don’t I use Selamat Hari Raya? Perlu ke use arabic phrase? Melayu dah lupa their root ke? Well.. I don’t care what people say. If everything need to use the Malay words.. then every time I want to say Alhamdulillah, I need to say Terima Kasih Allah? Hmmm.. I don’t think so kan? Hehehe.. just saying.

Anyway.. this year is our 1st time celebrating Eid in Oman. Sedih? Sedih la jugak but I am grateful that even though we were celebrating Eid away from family and friends.. our daughters Aina and Nurin are with us in Oman to celebrate Eid. They were back from UK couple of days before Ramadan. As my other half said “.. the sense of completeness fills the heart..”hehehe. As usual.. the Malaysian Embassy did their Raya Open House on the first day of Raya. We did our own open house the next day… invited few families… dapat lah merasa suasana raya tu.

As for this cake.. I made it yesterday.. the cake is moist and delicious. Not that difficult to make.. took me a little over 2 hours from start to finish. Amount of eggs and butter used were very minimal except for the cream cheese.. it uses 500g. Quite a lot for just 3 layers of it. Anyway.. worth the effort and definitely a recipe to keep. The recipe was taken from here. Enjoy and happy baking peps!

20160714_172256-01

Ingredient  for Red Velvet Layer:

  • 250g Butter
  • 5 Grade A Eggs
  • 235g Flour*
  • 2 tbsp Cocoa* (* sift together)
  • 175g Caster Sugar
  • 150g Condensed Milk
  • 1 cup (135g) Mixed Berries Yogurt or 1 cup of buttermilk
  • 1 tsp Ovallette
  • Red Coloring 

Ingredient for cheese layer:

  • 500g Cream Cheese
  • 3 Grade A Eggs
  • 120g Caster Sugar
  • 1 tsp Vanilla Essence

Method:

Red Velvet:

  1. Beat butter & sugar until fluffy. Add in ovallette, egg one by one while continue beating until smooth.
  2. Add in condensed milk & mix well.
  3. Add in flour mixture* gradually & combine with slow speed. Add in yogurt or buttermilk and red color; mix well.

Cream Cheese:

  1. Beat cream cheese & sugar until smooth and combined.
  2. Add in egg and Vanilla Extract and mix until combined.

Baking:

  1. Preheat oven to 170 to 190C… grease 8″X 8″ baking pan
  2. Weigh the red velvet batter and divide it by 9 ( the number of layers..mine was about 155g per layer)
  3. Weigh the cheese batter and divide it by 3 (the number of layers.. mine was about 141g per layer)
  4. Place the greased baking pan in the preheated oven for 1 mins. Then take it out and pour 155g of red velvet batter into the batter and bake it for about 6-7 min.
  5. Repeat the process for red velvet batter for another 2 layers.
  6. Now pour the cheese layer. bake until cooked.
  7. Repeat the whole process.. it should be 3 red velvet layers, 1 cheese layer, 3 red velvet layers, 1 cheese layer, 3 red velvet layers, 1 cheese layer.

Rainbow Cake 2

DSC_3820

May and June were the 2 most stressful months for me for the last 4 years and it has not changed much for this year. Having said that, I think I have learn to let go certain thing over the course of these 4 years and I think I am more relaxed this year with the whole exam thingy… lucky for Sofea. For some of my friends who have kids taking IGSCE exam for the first time, I can see how stressful this must have been for them.. looking at them took me back 5 years ago when Aina took her IGCSE hehehe… breathe in breath out Mummies!

As of last saturday Sofea has completed 12 papers and she still has 4 more to go. Last 2 papers gonna be English and they will be conducted during Ramadhan… I hope I can have an IGCSE/A level stress free for the next 3 years as Jasmine will only take her IGCSE in 2020 insyaallah.

Unlike in Malaysia where there are tons of tuition center around, here.. to get additional help outside school is very difficult. The teachers are not willing to do a paid tuition classes because of the law but they always do extra lessons after school.. just that sometimes those extra classes are not enough. Besides that, there are no practice questions being published like the one in Malaysia that can hep the kids to do extra work.. they only rely on the questions given by the teachers and also the past papers. I remembered when I was doing my SPM… my days were filled with doing sample questions just to familiarize myself with different type of questions. Here.. you only rely on teachers and school .. sigh!

DSC_3823

Enough with that.. okay.. what can I say about Rainbow cake… hmmm this cake I baked for Haqeem’s birthday quite sometimes ago. It was quite sweet for my liking, but my kids absolutely loved them. It was a hit among some of my friends and I have baked this cake more than 5 times for the last few months. If you have time, do try and bake this cake as the kids would definitely love the taste and not to mention the colours. For this cake I used Swiss buttercream frosting as it is not too sweet and it will compliment the cake. The recipe was taken from Diva can Cook.

Ingredients:

  • 2½ cups white granulated sugar (you can reduce the sugar to 2 cups as I think the cake is a bit sweet)
  • 1 cup butter, softened
  • 3 eggs
  • 1 tablespoon vanilla extract
  • 1 cup buttermilk
  • ¼ cup heavy whipping cream
  • 3 cups all purpose flour
  • 1 tablespoon baking powder
  • ½ teaspoon salt
  • Food coloring: red, yellow, blue, green
  • Swiss buttercream
Methods
  1. Preheat oven to 160 C.
  2. Generously grease and flour 6 (9-inch) cake pans. I only had 3 pans so I had to bake in two rounds.
  3. In a large bowl cream together sugar and butter.
  4. Mix in eggs until thoroughly incorporated.
  5. Mix in vanilla extract, buttermilk and heavy cream.
  6. Mix in half of the flour, baking powder, and salt.
  7. When mixture is combined, mix in the rest of the flour.
  8. Divide the batter into six bowls (I weigh the batter and divide them by 6)
  9. Add food coloring to each bowl to create a vibrant red, orange, yellow, green, blue, and violet. (see note on how to make colors)
  10. Pour each colored batter into the prepared pans and spread out into an even layer. (layers will be thin)
  11. Bake for 10-15 minutes or until center is set.
  12. Remove from oven and let cakes cool in the pan until pans are warm enough to touch.
  13. Run a spatula around the edges of the pans to loosen the cake and then very carefully remove the cakes from the pans.
  14. Place on a cooling rack and cool completely.

To assemble

  1. Place the violet layer down first and frost.
  2. Followed by the blue layer, green layer, yellow layer, orange layer and finally the red layer. (frost between each layer)
  3. Frost the whole cake.( I did the naked cake style.. )
  4. Slice & serve!

DSC_3825

Kek Lapis Lengit Rainbow

Kek lapis Lengit Rainbow

Is this my first posting in 2016? ..and it is March already? Well.. time surely flies when you are having fun hahaha. Whatever it is I surely want to say Alhamdulillah.. thank you Allah for all the good and the bad things that came my way in 2015… things that make you sad the most is actually a blessing.. coz Allah is giving you a chance to  cry and beg for His mercy and guidance.. to make you closer to Him. Kalau happy memanjang, doa lepas solat tu baca macam baca script aje.. tapi kalau time susah tu.. doa dgn penuh emotion.. betul tak?

So.. my very first posting this year I want to start with something sweet, colourful and fattening hehehe.. just look at the amount of butter that it uses. Whatever it is… this cake is truly worth trying… moist and delicious. Thank you to Rima Bisous A Toi for sharing the recipe. You can checkout the original posting here.

Moist and to die for..

Ingredients
(A)
700g eggs – abt 12 eggs
450g sugar
18g Emulsifier
1/2 tsp vanilla paste – i didnt hv so i substitute with use 1/2 tsp of vanilla essence
1/2 tsp milk paste – i didnt hv so i substitute with use 1/2 tsp of vanilla essence
(B)
325g low protein flour – i use normal flour

(C)
400g margarine
300g butter (or butter substitute) – i used 700g normal Lurpak butter

(D)
1/2 tsp spekkeok powder
purple, blue, green, yellow, orange and red colour paste

Method

  1. Preheat oven 160C.. grease 8″ baking pan
  2. Whisk butter till creamy – put aside
  3. In another bowl, whisk ingredients A until fluffy.
  4. Add ingredients B – beat again until blended. Add ingredients C – beat again until blended
  5. Weigh your batter and divide it by 13 (the number of layers)
  6. Part 1 (equivalent to 7 layers) – add spekoek powder
  7. Part 2 (equivalent to 6 layers/divided into six bowls) – add colour paste to each bowl
  8. Once ready.. pour about 164g of spekkeok batter (plain batter) into your baking pan and bake it for 10mins..
  9. Change your oven setting to grill mode and pour in purple batter.. this is how the layer should be.. plain – purple – plain – blue – plain – green – plain – yellow – plain – orange – plain – red – plain.
  10. On the last layer bake it using grill mode until brown changing it to bottom heat and bake a further 5 to 10 mins.